EARN 120% BITCOIN IN JUST 60 DAYS

Showing posts with label MOBILE. Show all posts

How to change fonts on Android

In almost all cases, the default font on your Android phone or tablet suffices. It looks pleasant and is usually of the right size for comfort. But, there will always be Android users who’d prefer some other typeface, who’d want to stand out from the crowd. And, there will always be that small crowd of people who tinker with their Android device’s fonts just for the sheer pleasure of being able to.
If you belong to either or both groups, you’re on the right page. The great thing about Android is that it is an extremely customizable mobile operating system; it even allows you to change the fonts used by its user interface. Font changing, however, doesn’t necessarily mean easy. In many cases, customizing fonts requires some technical know-how.
In this guide, learn how to change fonts on Android. Two types of methods are discussed: one not needing root, and the other requiring root.

Non-root methods

Through custom OEM skins

Stock Google Android doesn’t have native functionality for changing system fonts. You certainly can’t easily change the fonts on Nexus phones and tablets — at least not with some bit of hackery. On none of the Nexuses, for example, can you just go to the Settings page and tap an option there to change the system fonts. Not even certain AOSP-based custom ROMs such as CyanogenMod or AOKP has a built-in function for changing system fonts on the fly.
But, when OEMs like Samsung and LG get their hands on AOSP code, they add extra bells and whistles– such as font changing — into their custom skins.

For instance, some Samsung Android devices such as the Galaxy S2, Galaxy S3, Galaxy Note, Galaxy Note 2, Galaxy Note 10.1, and even the Galaxy Camera, let you change the font style. Samsung has preinstalled a few extra fonts besides the default, but you can get more online through the Google Play Store.
There’s similar functionality on certain LG phones, too, and to fetch more fonts, you’ll be redirected to the LG Smart World instead of to the Google Play Store.
Putting on a new font requires only a quick trip to Settings > Display > Font Style. Just tap the name of the font that you want, and confirm that you want to set it as system font. Font replacement is instantaneous. No need for rebooting. The selected font will be displayed throughout your device’s interface such as the time on the status bar, system menus, and even on your text messages.

Through custom launchers

One non-root way to change fonts on Android is through custom launcher apps. Some custom launchers integrate the font-changing function, while most others will need you to install themes.
One very popular custom launcher that provides a way to change fonts is GO Launcher EX.
A downside to font customization in GO Launcher EX is that it doesn’t change the font in your apps and Android system menus. The font changes are applied only to selected parts of the custom launcher UI but not to the entire system. To change font styles in GO Launcher EX, do the following:
  1. Copy your TTF font files to the /sdcard/GOLauncherEX/fonts directory.
  2. Open GO Launcher EX.
  3. On the main home screen, tap the Menu button (represented by 3 dots) or swipe the screen upwards.
  4. Tap on the Preferences button to bring up the GO Launcher Settings page.
  5. Tap on Visual Settings.
  6. Swipe to the Font tab on the left.
  7. Tap on Scan Font to let the app scan your directories for font files. If everything goes well, the app should also be able to find the fonts that you copied to the /sdcard/GOLauncherEX/fonts directory.
  8. Tap Select Font and tap on the font that you want to use.


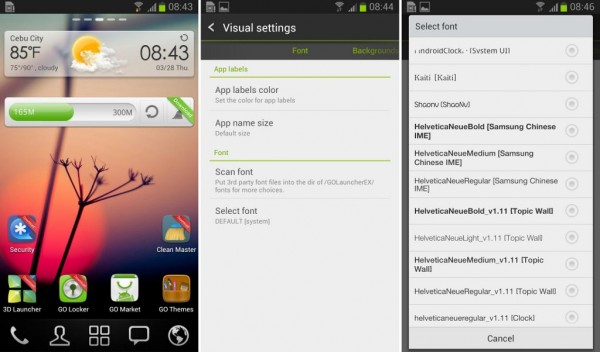
Changes will apply immediately. No need for rebooting. If you want more fonts for use with GO Launcher EX, download and install GO Launcher Fonts.

iFont (for Samsung devices)

The popular iFont app can also be used for changing fonts. Although primarily for Samsung devices (both rooted and non-rooted), the app can also work on certain rooted, non-Samsung devices.
On non-rooted Samsung devices, use iFont’s Online tab to browse for available fonts. To use a font on the list, do the following:
  1. Enable installation of apps from “Unknown Sources.” This option can usually be found in Settings > Security.
  2. Launch iFont. Go to the Online tab.
  3. Tap on a font name that you want to install.
  4. Tap the Download button.
  5. Tap the Set button. Or go to Settings > Display > Font Style. Your newly installed font should appear on the list.
  6. Tap on the new font to use it as system font.
  7. Font is applied immediately. No reboot needed.


    You can also copy TrueType (TTF) fonts from your PC to the /sdcard/ifont/custom directory; the said fonts will appear on the Custom tab. But, to be able to install and use the fonts, you will need a rooted device. (For a guide on using this app on rooted devices, see the iFont subsection under “Methods requiring root.”)
    iFont is free and shows no ads. It worked quite well on several devices (including non-Samsung phones) that I tested it on.

    Methods requiring root

    Important note

    If you have root privileges on your phone or tablet, you will be able to alter system files and, in the course of doing so, you could render your device useless. So, be careful.
  8. The information in this guide is provided for instructional and educational purposes only. There is no guarantee that these instructions will work under your specific and unique circumstances.
  9. Use these instructions at your own risk. We shall not hold any responsibility or liability for whatever happens to you or your device arising from your use of the info in this guide.
  10. Read and understand the whole guide first before actually performing the instructions.

Font changer apps for rooted devices

An easy way to change fonts on rooted Android devices is to use font changer apps that support use on rooted devices. There are several of such apps on the Google Play Store. Most of them also offer a preview function that lets you see how a font looks like.
In this subsection, know more about two font changer apps that are worth checking out: Font Installer and iFont.

Font Installer

For rooted phones, Font Installer is a great free app for changing system fonts. It has a built-in font preview feature, so while scrolling up and down the list of built-in fonts, you know exactly how they look like once activated on the device.

This is an ad-supported app. Ads appear at the bottom. Remove the ads by purchasing a license.
To install a TTF font file that you’ve saved to your device:
  1. Copy to your device the TTF font file that you want to use, preferably into the /sdcard directory.
  2. Launch Font Installer.
  3. Before tampering with your system fonts, backup your existing default fonts first. Tap on the Menu (three dots) button and select Backup/Restore. Select Backup. If Superuser or SuperSU asks for permission, grant it.
  4. Tap on the Local tab to open the directory explorer. Locate your TTF file.
  5. Tap on the TTF file that you want to use. From the popup dialog, tap Install to set it as the default system font. (If you want to preview the font first, tap on Preview.)
  6. If Superuser or SuperSU asks for permission, grant it.
  7. Font Installer will prompt you to reboot your device. Tap on Yes.
    To install a new font from Font Installer’s online font collection:
  8. Open the Server tab in the Font Installer app to see the catalog of fonts.
  9. Tap on the name of a font that you like.
  10. From the popup dialog, tap on Preview if you want to see sample text rendered in the chosen font; or, tap on Install if you want to download the font and set it as your system font.
  11. If a backup warning/notice appears, make sure you let the app backup your font files. This shouldn’t take a long time.
  12. Allow the app to reboot your device.

iFont

Unlike Font Installer, the iFont app can work on most Samsung devices even if they are not rooted. But, to be able to use it on a non-Samsung device, you will need root access. (Yes, you can also use it on a rooted Samsung device.)
To download, install, and use a custom font using the Online tab:
  1. Tap on the font you want to install.
  2. Tap the Download button.
  3. Tap the Set button.
  4. If you get a prompt about setting the mode to System Mode, just tap the OK button.
  5. Your device will reboot to apply the new font If you want to use a local TrueType (TTF) file, just copy the TTF file to the /sdcard/ifont/custom directory on your device. Then, do the following:
  6. On the iFont main screen, tap on the Menu button (three-dots at upper-right corner).
  7. Tap on Settings > Change Font Mode. If you’re using a rooted non-Samsung device, choose System Mode. If using a rooted Samsung device, choose Samsung Mode.
  8. Go to the Custom tab in the iFont app.
  9. Tap on the font that you’d like to use.
  10. Tap the Set button.
  11. If prompted whether to change the font, tap on OK.
  12. If you get a prompt about setting the mode to System Mode, just tap the OK button.
  13. Your device will either apply the new font immediately or reboot to apply the new font.

The geeky way

So far, I’ve told you about the painless, sweat-free, and easy ways to change fonts on your Android. But, if you have the heart of a geek, or you just love the thrill of doing stuff manually, then you’ll find much fun in manually changing the fonts on your Android device.
These manual methods require root because you’ll be tampering with a protected system directory, specifically the /system/fonts directory, where font files used by your device reside. There are two manual methods for changing fonts — through the Android Debug Bridge and through a root-level file manager app. Before I talk about those two, let’s talk about system fonts first.

System fonts

If you are brave enough to manually change fonts on your Android, the font files that will be of great interest to you will be the following:
  • Roboto-Regular.ttf — This font file is the most used system-wide. I see it almost everywhere — from app labels to menu text.
  • Roboto-Bold.ttf — This is the boldface variant of Roboto. Unlike the regular typeface, this one’s not as frequently seen. There’s bold text in several areas of your device, and this font face is most likely the one used.
  • Roboto-Italic.ttf — This is the italic variant of Roboto.
  • Roboto-BoldItalic.ttf — This is the boldface and italic variant of Roboto.
All of these fonts are inside the /system/fonts directory. For starters, you might want to play around with the Roboto-Regular.ttf file, as it’s the one that appears to be most used system-wide.


The overall general idea is to replace system font files with new font files having exactly the same file names as the originals but containing the new typefaces that you want to use.
For example, if you want to use a TTF font file named Times_New_Roman.ttf in place of Roboto-Regular.ttf, you’ll need to rename the Times_New_Roman.ttf file into Roboto-Regular.ttf and copy the renamed (faux) file into the /system/fonts directory.
VERY IMPORTANT: Always make a backup copy of the font files that you will be replacing so that if something goes wrong, you will have copies to restore. I usually rename the original file into something with a *.bak extension, or with “bak” within the file name (i.e., Roboto-Regular.ttf becomes Roboto-Regular.ttf.bak or Roboto-Regular-bak.ttf). This way, the original file remains in the same directory but under a different file name.
It is also a wise idea to make backup copies on your PC hard drive and in a different directory on your Android device.

Source :- androidauthority

Mobile numbers to become 11-Digit in India by 2013


Mobile subscribers in India will soon have 11-Digit mobile numbers as India is bound to experience number crisis by next year.According to The Times of India report “All the phone number series which are currently in use is nearing an end”.

Rajan Mathews, director general of the COAI said, There might be a serious problem if a new series of numbers are not brought in by the middle of next year. We are theoretically reaching the limit of existing number sets with a subscriber base of one billion.”

Every operator is allotted a unique range of numbers.The first two digits are associated with the operator.

Sandip Biswas, director at consultancy firm Deloitte said, None of these number ranges can be used to their full extent due to the way in which they are allotted. Only a certain portion of these numbers are used as phone numbers. This is called percentage of numbering system utilization and it hovers around 50 percent, meaning only around half or more of the potential numbers are used as phone numbers.the numbers will have to be increased by at least one digit to accommodate new devices. However, to ensure there’s absolutely no scope for any problem, we may even see the introduction of 12 digit numbers.

India will be the third country apart from china and UK to use 11-digit mobile number.
Source :- geektech

FACEBOOK ANYTIME ANYWHERE Without Internet

Fonet-Wish for FACEBOOK


Now , Anyone Can Access FACEBOOK form Anywhere Anytime Without Internet Connection.


If i can say i am using Facebook form MY NOKIA 1112
No one Can Believe ....

 Using FONET_WISH it is Possible to access facebook from Any mobile without internet connection.

How its work::

Fonetwish is an USSD based interactive service which brings the power of internet to every mobile phone. Fonetwish provides access to facebook from any mobile phone without the requirement of any data(internet) connection. Just dial *325# from your mobile phone and get started, fonetwish provides all the major features of facebook like status update, wall post, friend requests, notifications along with the above fonetwish provides push notifications an innovative new feature by which your facebook notifications are pushed into your mobile handset automatically as and when they are generated. So, the next time when you want to update your status or post on a friends’ wall no need to worry about overpriced SMS’s or a Data Connection. Just dial *325# from your mobile phone and get started.

IN SIMPLE ::

If u you have following operator in cellphone:

Airtel, Aircel, Idea, Videocon, Loop mobile , Tata Docomo and also in Uninor,

IN uninor and tatadocomo it is free in some number.

Just dial *325#


How to Hack Symbian S60 Phones to Install Unsigned Applications

Hack Symbian S60 PhonesIf you own a Nokia Symbian S60 phone, you will most likely be aware of the fact that it is not possible to install applications on it unless they are signed using a valid certificate. Have you been trying to install applications on your S60 3rd or 5th edition phone but ending up getting a certificate error? At times, this can be really annoying; but here is a smart solution to this problem!
Here in this post, I will show you how to hack your Symbian S60 3rd or 5th edition smartphone, so as to modify the phone’s firmware and completely bypass the mandatory signing requirement. So, once you are done with this one time hack, you should be able to install any compatible application including unsigned and those with an expired certificate.

What is the Need for Signing Applications?

From the 3rd edition onwards, all the Symbian S60 applications need to be signed in order to ensure their integrity, so that it would not be possible for a third party to tamper with the application. Also, signing ensures that you always install applications from a trusted source.
However, there are many freeware and beta applications that come unsigned as the developers cannot afford to buy a symbian certificate. Hence, it can be a real nightmare for the users who need to install such applications on their phones. So, here is a step-by-step procedure to hack your phone and permanently disable this security feature:
  1. Download the latest version from the HelloOX2 Ofiicial Website.
    HelloOX2 is an excellent tool to hack Symbian S60 3rd, 5th and Symbian^3 smartphones which makes it possible to install a root certificate by gaining full access to the phone’s system files. With this capability, you can install anything you want on your phones without the need to worry about the annoying certificate error!
  2. The signed version of HelloOX2 demands for a donation and hence, only the unsigned version is available for free download. So, if you have the unsigned version, you need to sign it before installing on your phone. In order to sign any application, you need to have the certificate and the key file which can be obtained as follows:
    • Go to the OPDA Website, get registered and login to your account.
    • Click on the “Apply Certificate” tab, enter the model number and the IMEI of your phone and then click on “Submit and Upload” button.
    • It will usually take up 24 hours for your certificate and key file to be generated and uploaded. To check the status of your certificate click on “My Certificate” tab. If the certificate is ready for the download, you will see something as follows:
    OPDA Certificate Status
    • Download the certificate and the key file on to your computer. Also download the SisSigner tool to sign your HelloOX2 application.
    • Open the SisSigner, load the HelloOX2.sis, certificate and the key file as shown below and click on “Sign”. Leave the “Key File Password” field blank.
    Hack S60 Phones
    • Your HelloOX2 application is now signed and ready for the installation.
  3. Install the signed HelloOX2 application on your phone and run it to start the hacking process, which is completely automatic. Within a minute your phone will be hacked. Once this is done, say goodbye to the annoying certificate error and install any application.
I hope you like this post. Express your opinion through comments. Enjoy!!!

Install Paid Android Applications For Free

Free-Android-Paid-Applications
Android, developed by Google is the most widely used mobile operating system that has more then 450,000 application. But all the applications are not free, some of them cost less and some cost quite a lot. Buying all of your favorite apps is not economically feasible. And hence we found two great apps which will let you download and install paid android apps absolutely free. The two apps are Applanet and BlackMart. You just need to install any or both of these applications to enjoy unlimited android apps and games for free.


Enable Your Device To Install From Unknown Sources :


enable-installation-from-unknown-sources-AndroidIf you have not enabled installation of applications from unknown sources on your Android device before, then read on. Otherwise skip this. 
An Android device is set to block installation of applications from unknown sources. Unknown source here typically means any source other than Google Play (Android Market). So in a situation where you need to install an application by transferring it from any other device like your computer, you need to unblock it. This can be done easily. Just follow these steps below.
  1. Click the "Menu" button on your home screen.
  2. Go to "Settings".
  3. Now go to "applications" tab.
  4. Now tick the "Unknown sources" option.
That's it. Now you can install any application from outside the Google Market also.

Installing and Using Applanet :


Applanet-Download-Paid-Android-Applications-For-FreeInstalling applanet is not at all hard. Just download the Applanet app. Transfer it to you phone or tablet or any other Android device through data cable or Bluetooth or any other supported transfer medium. Now enable installation from unknown sources and install the app on your device.

After installation just run the app from the menu. You will see a screen as shown on the right side. The interface is quite similar to the Google Play Store or the Android Market. On the top right you will have a search option, that allows you to search for any application, game or any stuff within the Applanet database. Till date Applanet has 15000+ apps in its database. You have to pay absolutely nothing for any full version paid app you download. Below the search button you will have three buttons, one for Applications which allows you to browse applications, second one for Games and the third for keeping an eye on your downloads. The games are also categorized on the basis of their genre and you can browse through them according to your own interest. So download Applanet app from here and download paid apps for free on your Android device. Click on the image to see a larger version of the screenshot.


Installing And Using BlackMart :


BlackMart-Download-Paid-Android-Applications-For-Free
The installation of BlackMart is exactly similar to Applanet. You have to first download the app from here. Now allow installation from unknown sources, then transfer the downloaded file to you Android device. After transferring the file, navigate to the file and install it. Now open the BlackMart application. You will see a screen as shown on the right side. The application interface is also similar to that of Google Play and Applanet. Applications and Games are arranged in different sections. The installed section shows the applications currently installed on your device and also if an update is available for any of your installed application. The only difference between the Applanet and BlackMart is when you download an application with Applanet, it automatically installs in your device, but when you download an application with BlackMart, it shows a notification in the notification tray that the application is downloaded and click here to install it. It requires just one additional click and nothing else. BlackMart also has a very vast database of best android apps and games and you can download any number of android apps for free using BlackMart.
 

© 2012 H@Ck tHe wOrLd - Designed by rAj | ToS | Privacy Policy | Sitemap

Join me On Facebook | Contact Us | Write For Us